This is the procedure for removing the electic rear seats of an E32 735. If your seats aren't electric, Don Gale has documented the procedure on his web site Gale's Repair Helps, specifically his Rear Seat Removal page. If you are an E32 owner you should have Don's site in your bookmarks.
Start with the small piece at the top of the fold-out centre arm. Fold out the arm and undo the leather backing piece - it is attached to the arm at the bottom but fixed to the car on the top and both sides vith Velcro. At the top of the opening you should find a single 10mm nylon insert locknut. Remove the nut and the top piece will pull straight up.
Now tackle the seat bases. Drive them both all the way forward. Now, put your hand in the gap between the base and the back, near the seatbelt socket, and ease apart the leather. It is held in place by velcro. If you look through the gap, near the seatbelt socket, you will see a bolt with a 17mm head. Unscrew it with the help of an extension bar on your socket wrench. If the locknut on the back is doing its job, it will stay attached to the bar it passes through.
Next, slide the lever on the front of the seat base to one side, and lift the front up, enough to put your hand in the gap and unplug the electrical connection. Once this is unplugged you can pull the seat all the way up at the front, then remove it from the car. Take care with the bar you unbolted at the start of the procedure, it will stay attached to the seat base. There is a piece of rubber on one end of it which is easy to loose.
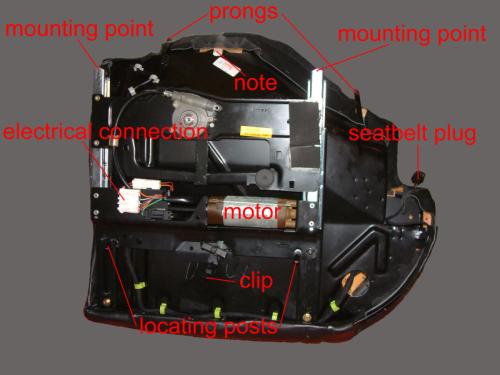
If your car is like mine you will find a little note taped into position at the back of one of your seats. If you remove it and unfold it it appears to be a production schedule for the car. It includes the chassis number, which may be helpful if your car is ever stolen.
You can now remove the seat back. Remove the plastic guard from the top of the seat - the seatbelt is threaded through it so you will just have to move it out of the way. It is held in place by two screws which were hidden by the small piece at the top of the centre armrest, and a clip at the other end which you can wiggle free.
The seat back is held in place by two bolts, one at the centre (where the centre piece used to be) and the other accessible through the headrest slot. Remove the two bolts and pull it away gently at the top - you need to reach around and unplug it.
If you are removing the seat because the headrest doesn’t move, you might have a problem - I know I did. If your headrest has broken in the extended position, you won’t be able to remove it, and you won’t therefore be able to get at the second bolt securing the seatback. What I did was removed the first bolt to give a bit more slack, then gently “recline” the seat so I could duck my head under it to take a look. The problem in my case was that the plug which the headrest mates with had shattered.
Hoping that the headrest itself was OK, I bared the ends of some cable and pushed them into the connector on the headrest. I connected one of the other ends of the cable to a fuse which was attached to the battery right next to me. The other end I brushed against the other battery terminal. The headrest retracted and I was able to remove it.
You remove the seat on the other side of the car in exactly the same manner as the first, although you might need to remove the centre of the seat to get at one of the connectors.
For the centre of the seat, the metal frame for the armrest is held by one bolt at the top centre, and two plastic nuts either side of the bottom. The centre base is held by two screws at the front.
Job done.
The reason I removed my seats was first of all to try and fix the headrest, secondly in my boot there is a hifi installation on a carpeted piece of wood at the rear of the boot. As this was faulty, I wanted to get at the wiring so I could test it. Unfortunately the wood had been attached through the bulkhead with nuts and bolts, so when I tried to unscrew it from the boot the nuts behind the rear seats just span. I have provided a much better solution for when the board goes back - I have attached some 50mm M6 bolts through the bulkhead with large washers on each side to provide more support, and fixed into place with a nut on the boot side. The panel will be held onto these studs using washers and wing nuts.
The third reason I removed the rear seats was so I could gain access to my noisy rear blind motor, but I will save that for another article.